共计 6621 个字符,预计需要花费 17 分钟才能阅读完成。
简介
Spring Security 是基于 Spring 实现的一个安全框架,其中包括非常多的过滤器,主要进行攻击防护、认证授权等功能。
过滤器链
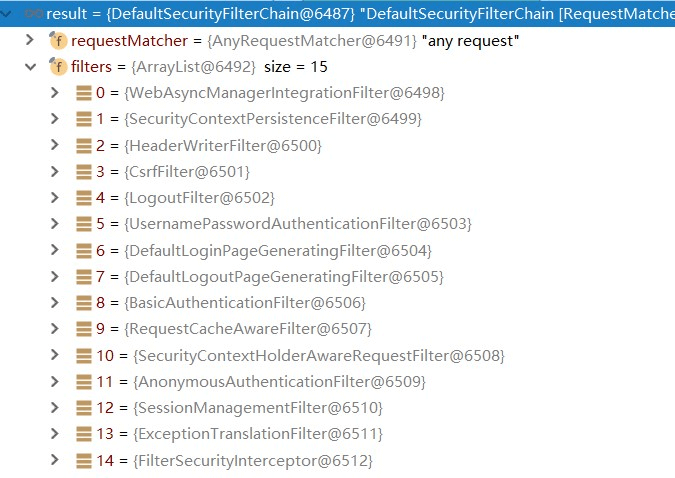
Spring Security 常用的过滤器有15个,如下图所示:

在 FilterChainProxy 类中的 doFilterInternal 方法打断点可以看见。
1.org.springframework.security.web.context.request.async.WebAsyncManagerIntegrationFilter
此过滤器用于继承 SecurityContext 到 Spring 异步执行机制中的 WebAsyncManager,和 spring 整合必须的。
2.org.springframework.security.web.context.SecurityContextPersistenceFilter
非常重要的一个过滤器,主要是使用 SecurityContextRepository 在 session 中保存或更新一个 SecurityContext,并将 SecurityContext 给以后的过滤器使用,来为后续 filter 建立所需的上下文,SecurityContext 中存储了当前用户的认证和权限信息。
3.org.springframework.security.web.header.HeaderWriterFilter
向请求的 header 中添加响应的信息,可以在 http 标签内部使用 security:headers 来控制。
4.org.springframework.security.web.csrf.CsrfFilter
Csrf 又称跨域请求伪造,SpringSecurity 会对所有 post 请求验证是否包含系统生成的 csrf 的 token 信息,如果不包含则报错,起到防止 csrf 攻击的效果.
这里需要提到的是,csrf 在前后端分离的项目中一般都会关闭,因为天然不怕 csrf 攻击,毕竟该攻击是基于 session 的,而前后端分离项目一般都是使用 token,将 token 放在请求头。
5.org.springframework.security.web.authentication.logout.LogoutFilter
匹配 URL 为 /logout 的请求,实现用户退出,清除认证信息。
6.org.springframework.security.web.authentication.UsernamePasswordAuthenticationFilter
认证过滤器,下面将详细讲解该过滤器,默认匹配URL为 /login 且必须为 POST 请求。
7.org.springframework.security.web.authentication.ui.DefaultLoginPageGeneratingFilter
如果没有在配置文件中指定认证页面,则由该过滤器生成一个默认的认证界面。
8.org.springframework.security.web.authentication.ui.DefaultLogoutPageGeneratingFilter
此过滤器生成一个默认的退出登录页面。
9.org.springframework.security.web.authentication.www.BasicAuthenticationFilter
此过滤器会自动解析HTTP请求中头部名字为 Authentication,且以 Basic 开头的头部信息。
10.org.springframework.security.web.savedrequest.RequestCacheAwareFilter
通过HttpSessionRequestCache内部维护一个RequestCache,用于缓存HttpServletRequest。
11.org.springframework.security.web.servletapi.SecurityContextHolderAwareRequestFilter
针对 ServletRequest 进行一次包装,使得 request 具有更加丰富的API。
12.org.springframework.security.web.authentication.AnonymousAuthenticationFilter
当 SecurityContextHolder 中认证信息为空,则会创建一个匿名用户存储到 SecurityContextHolder 中,SpringSecurity 为了兼容未登录的访问,也走了一套认证流程,只不过是一个匿名的身份。
13.org.springframework.security.web.session.SessionManagementFilter
SecurityContextRepository限制同一个用户开启多个会话的数量。
14.org.springframework.security.web.access.ExceptionTranslationFilter
异常转换过滤器位于整个 SpringSecurityFilterChain 的后方,用来转换整个链路中出现的异常。
15.org.springframework.security.web.access.intercept.FilterSecurityInterceptor
获取所有配置资源的访问授权信息,根据 SecurityContextHolder 中存储的用户信息来决定其是否有权限。
认证过程
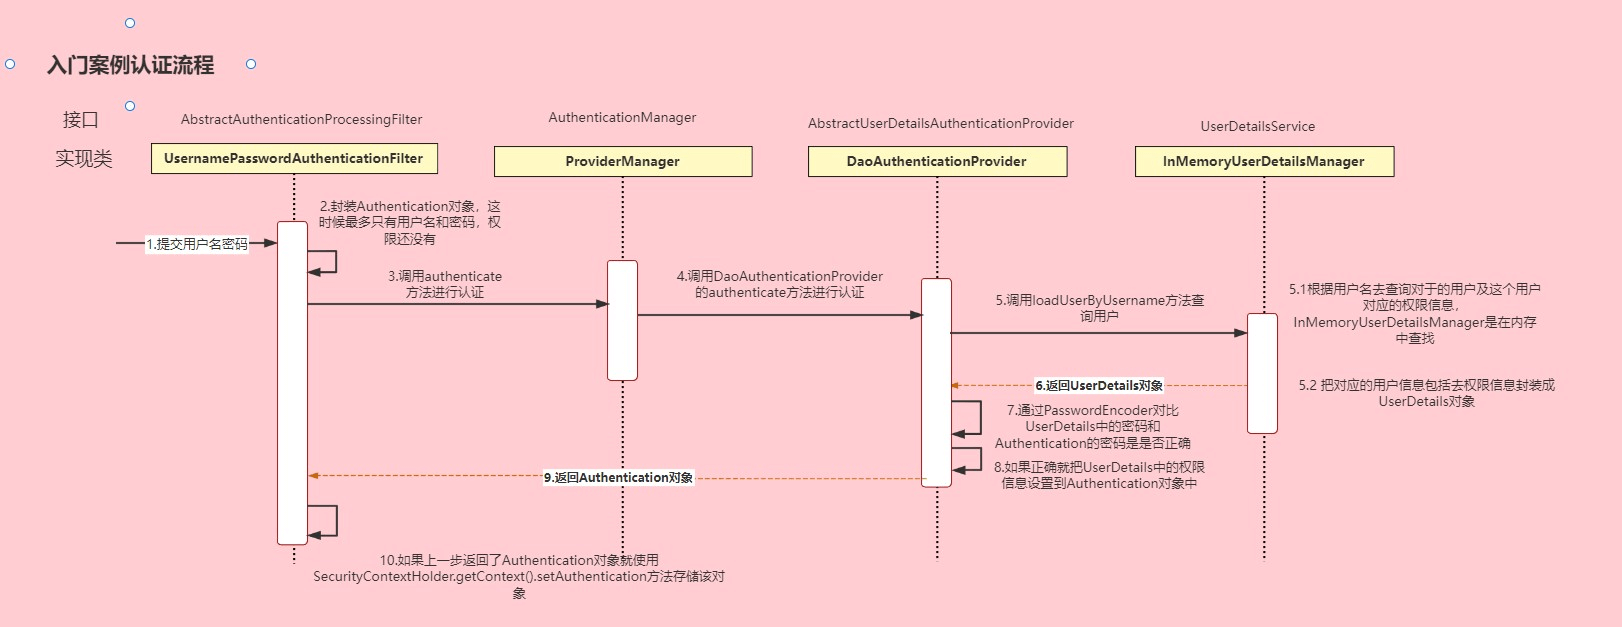
认证过程如下:

1.在过滤器链的初始阶段,用户名和密码会被封装成 UsernamePasswordAuthenticationToken,也就是 Authentication 对象,因为继承于它。
2.过滤器会调用 authenticate 方法将 Authentication 对象传递给 AuthenticationManager(认证管理器)。但是它不会进行对用户信息的认证,通过委托多个 AuthenticationProvider 来完成身份验证,只要有一个 AuthenticationProvider 验证成功,就会返回一个已经填充了用户认证信息的 Authentication 对象。
3.在 AuthenticationManager 中,这里是真正对用户信息进行认证的地方。认证管理器会调用 UserDetailsService 接口来获取用户的详细信息。UserDetailsService 是 Spring Security 用于获取用户信息的接口,它需要实现一个 loadUserByUsername()方法,根据用户名查询用户信息。
4.UserDetailsService 返回一个实现了 UserDetails 接口的对象,该对象包含了用户的详细信息,如用户名、密码和权限等。
5.在 AuthenticationProvider 中将 Authentication 对象的密码与用 PasswordEncoder 加密 UserDetails 的密码进行验证是否正确。正确则返回 UserDetails 的权限设置到 Authentication 对象中,并返回。
6.认证成功后,Spring Security 会将认证信息存储在 SecurityContext 中。SecurityContext 是一个线程本地的容器,用于存储当前用户的认证信息。
7.可以配置一个认证成功处理器来处理认证成功的逻辑,例如,更新用户在数据库中的登录失败次数和上次登录时间等等。
自定义认证
需要注意的是,配置文件中需要 HttpSecurity 调用 formLogin 方法,过滤器链才会注入 UsernamePasswordAuthenticationFilter、DefaultLoginPageGeneratingFilter 和 DefaultLogoutPageGeneratingFilter,否则将没有认证过程,那么除了开放的所有请求,其他的请求都将是 403,因为 SecurityContextHolder 里面没有内容。
在实际项目中,登录的接口一般都是自定义,毕竟除了验证账户密码还需要进行一些其他的操作,比如用 jwt 生成 token,放入 redis 并将 token 返回。
而 Spring security 的默认过滤器并不能做到,于是需要在配置文件中手动注入 AuthenticationManager,在自定义的登录接口注入该对象,并调用 authenticate 方法进行认证。所以此时又回到了刚刚所说的认证流程,还是能调用到重写的 loadUserByUsername 方法。
@Service
public class LoginServcieImpl implements ILoginServcie {

    @Resource
    private AuthenticationManager authenticationManager;

    @Resource
    private RedisCache redisCache;

    @Override
    public ResponseResult login(User user) {
        UsernamePasswordAuthenticationToken authenticationToken = new UsernamePasswordAuthenticationToken(user.getUserName(),user.getPassword());
        // 这里会去调用 UserDetailsService 的 loadUserByUsername,如果认证失败将抛出异常 BadCredentialsException
        Authentication authenticate = authenticationManager.authenticate(authenticationToken);

        //如果认证没通过,给出对应的提示
        if(Objects.isNull(authenticate)){
            throw new RuntimeException("登录失败");
        }
        //如果认证通过了,使用userid生成一个jwt jwt存入ResponseResult返回
        LoginUser loginUser = (LoginUser) authenticate.getPrincipal();
        String userid = loginUser.getUser().getId().toString();
        String jwt = JwtUtil.createJWT(userid);
        Map<String,String> map = new HashMap<>();
        map.put("token",jwt);
        //把完整的用户信息存入redis  userid作为key
        redisCache.setCacheObject("login:"+userid,loginUser);
        return new ResponseResult(200,"登录成功",map);
    }
}
登录接口返回了 token,那么接下来调用其他的接口时就需要将该 token 给带上,比如放在请求头。
虽然说认证已经通过了,但是传递 token 后,程序怎么就能判断用户是否有权限呢?答案是自定义过滤器。
自定义过滤器需要做的事情有:
1.判断请求头是否带有 token,如果没有 token 就放行,除了放行的请求不用担心其他请求会顺利通过,因为接下来的权限拦截器 FilterSecurityInterceptor 会校验权限,并返回 403。
2.如果请求头带有 token,需要解析 token 得到用户 id,并通过用户 id 获取 redis 中用户信息。
3.获取到用户信息,将权限信息封装到 Authentication 对象中,再将 Authentication 放入 SecurityContextHolder,这样所有过滤器都能获取到 Authentication 对象,包括其中的权限信息,到后面的权限过滤器根据其权限判断拦截或放行。
@Component
public class JwtAuthenticationTokenFilter extends OncePerRequestFilter {

    @Autowired
    private RedisCache redisCache;

    @Override
    protected void doFilterInternal(HttpServletRequest request, HttpServletResponse response, FilterChain filterChain) throws ServletException, IOException {
        //获取token
        String token = request.getHeader("token");
        if (!StringUtils.hasText(token)) {
            //放行
            filterChain.doFilter(request, response);
            return;
        }
        //解析token
        String userid;
        try {
            Claims claims = JwtUtil.parseJWT(token);
            userid = claims.getSubject();
        } catch (Exception e) {
            e.printStackTrace();
            throw new RuntimeException("token非法");
        }
        //从redis中获取用户信息
        String redisKey = "login:" + userid;
        LoginUser loginUser = redisCache.getCacheObject(redisKey);
        if(Objects.isNull(loginUser)){
            throw new RuntimeException("用户未登录");
        }
        //存入SecurityContextHolder
        //TODO 获取权限信息封装到Authentication中
        UsernamePasswordAuthenticationToken authenticationToken =
                new UsernamePasswordAuthenticationToken(loginUser,null,loginUser.getAuthorities());
        SecurityContextHolder.getContext().setAuthentication(authenticationToken);
        //放行
        filterChain.doFilter(request, response);
    }
}
注意配置过滤器后,需要在配置文件中添加该过滤器。
@EnableWebSecurity
@EnableGlobalMethodSecurity(prePostEnabled=true)
public class WebSecurityConfiguration extends WebSecurityConfigurerAdapter {

    @Resource
    JwtAuthenticationTokenFilter jwtAuthenticationTokenFilter;

    @Bean
    public PasswordEncoder passwordEncoder(){
        return new BCryptPasswordEncoder();
    }

    @Override
    protected void configure(HttpSecurity http) throws Exception {

        http.csrf().disable()
                .sessionManagement().sessionCreationPolicy(SessionCreationPolicy.STATELESS)
                .and()
                .authorizeRequests()
                //不通过Session获取SecurityContext
                    .antMatchers("/user/login").permitAll()
                    .anyRequest().authenticated()
                .and().cors();
        //添加过滤器
        http.addFilterBefore(jwtAuthenticationTokenFilter, UsernamePasswordAuthenticationFilter.class);
    }
}
提醒:本文发布于621天前,文中所关联的信息可能已发生改变,请知悉!


